
Extracting and Warping a Raster
Sometimes you need just a portion of a raster for use in your latest mapping project. In this example we will see a simple way to extract a rectangular region of an image and warp it to the desired projection.
The tools for accomplishing this feat are gdal_translate and gdalwarp, both part of the GDAL suite of utilities.
On Linux and Windows you can easily get access to these tools by installing FWTools. If you use a Mac, download the GDAL framework and required dependencies from Kyng Chaos.
For this example we’ll be using the world mosaic[1], available from the GIS Data page.
The first step is to determine the coordinates for the latitude/longitude box of interest. In this case we’ll just pull out Alaska since I happen to know the bounding box is approximately -180, 72 to -129, 50 (upper left to lower right). To extract Alaska from the raster, we use:
$ gdal_translate -a_ullr -180 72 -129 50 -projwin -180 72 -129 50 \

  world_mosaic.tif alaska_mosaic.tif

Input file size is 8192, 4096

Computed -srcwin 0 409 1161 501 from projected window.

0...10...20...30...40...50...60...70...80...90...100 - done.
The -projwin option specifies the area we want to clip out of the image using the coordinate system. Note we could use the -srcwin option to specify the clip area using pixel coordinates for the upper left corner and a size in the x and y directions, also in pixels. We also used the -a_ullr option to force the output image to have the bounding coordinates we want, otherwise it would be offset by a half pixel in both the x and y direction.
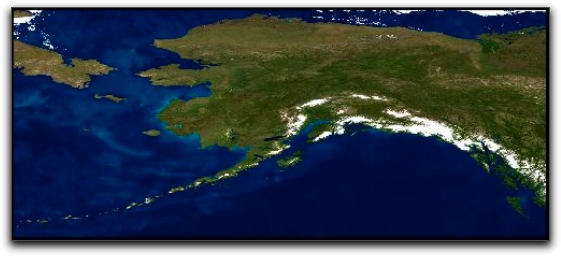
The result is a GeoTIFF of Alaska with the same coordinate system as the original raster (Geographic, WGS84):
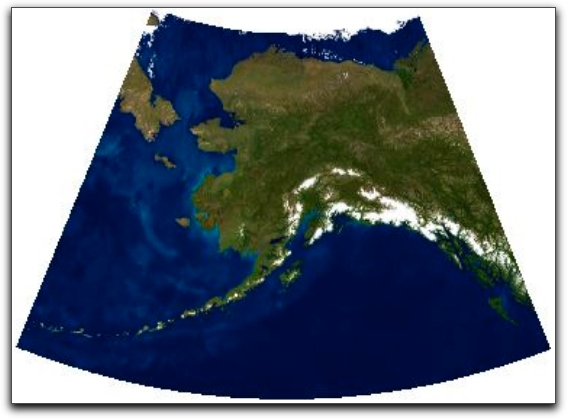
Now let’s change the coordinate system of alaska_mosaic.tif to Alaska Albers Equal Area, a projection commonly used for Alaska data. The EPSG code for the projection is 2964, however it specifies the units as feet rather than meters. All my other Alaska data is in meters so for this transformation we’ll specify the projection parameters for the -t_srs option in PROJ.4 format[2]. The steps to warp the image are:
$ gdal_translate -b 1 -b 2 -b 3 alaska_mosaic.tif alaska_mosaic_noalpha.tif

$ gdalwarp -t_srs '+proj=aea +lat_1=55 +lat_2=65 +lat_0=50 +lon_0=-154 +x_0=0 \

  +y_0=0 +ellps=clrk66 +datum=NAD27' alaska_mosaic_noalpha.tif \

  alaska_mosaic_albers.tif

Creating output file that is 1296P x 944L.

Processing input file alaska_mosaic_noalpha.tif.

:0...10...20...30...40...50...60...70...80...90...100 - done.
Notice we translated the image before the warp using gdal_translate. This was to remove the alpha channel from the original image. The alpha channel is used to determine transparency for each pixel in the image. In the case of our mosaic, it was found by trial and error that the oceans were transparent. When warped, they turned black. To get around this problem, we used gdal_translate with a series of -b switches to specify which bands in the image should be used in the output image. This effectively strips the alpha band. If you were to run gdalinfo on alaska_mosaic.tif, you would see that it reports Bands 1 through 3 as red, green, and blue respectively, as well as Band 4 as alpha. Once we removed the alpha band the warp gives us the expected result:
Using GDAL is a quick way to extract a region from a raster. Take a look at the full set of GDAL utilites for information on the other utilities available for your mapping needs.
[1] To get rid of the somewhat arcane file name, in the example I’ve renamed the original raster in the land_ocean_ice zip file to world_mosiac.tif.
[2] You can use the tools at the Spatial Reference site to determine the PROJ.4 format, as well as a number of others for a given projection.
 January 24, 2008
·
January 24, 2008
·  admin ·
  No Comments
 Posted in: GDAL, Rasters


